
Watch Now This tutorial has a related video course created by the Real Python team. Watch it together with the written tutorial to deepen your understanding: Socket Programming in Python Part 1: Handling Connections
Sockets and the socket API are used to send messages across a network. They provide a form of inter-process communication (IPC). The network can be a logical, local network to the computer, or one that’s physically connected to an external network, with its own connections to other networks. The obvious example is the Internet, which you connect to via your ISP.
In this tutorial, you’ll create:
By the end of this tutorial, you’ll understand how to use the main functions and methods in Python’s socket module to write your own client-server applications. You’ll know how to use a custom class to send messages and data between endpoints, which you can build upon and utilize for your own applications.
The examples in this tutorial require Python 3.6 or above, and have been tested using Python 3.10. To get the most out of this tutorial, it’s best to download the source code and have it on hand for reference while reading:
Get Source Code: Click here to get the source code you’ll use for the examples in this tutorial.
Networking and sockets are large subjects. Literal volumes have been written about them. If you’re new to sockets or networking, it’s completely normal if you feel overwhelmed with all of the terms and pieces.
Don’t be discouraged though. This tutorial is for you! As with anything Python-related, you can learn a little bit at a time. Bookmark this article and come back when you’re ready for the next section.
Take the Quiz: Test your knowledge with our interactive “Socket Programming in Python” quiz. You’ll receive a score upon completion to help you track your learning progress:
Interactive Quiz
In this quiz, you'll test your understanding of Python sockets. With this knowledge, you'll be able to create your own client-server applications, handle multiple connections simultaneously, and send messages and data between endpoints.
Sockets have a long history. Their use originated with ARPANET in 1971 and later became an API in the Berkeley Software Distribution (BSD) operating system released in 1983 called Berkeley sockets.
When the Internet took off in the 1990s with the World Wide Web, so did network programming. Web servers and browsers weren’t the only applications taking advantage of newly connected networks and using sockets. Client-server applications of all types and sizes came into widespread use.
Today, although the underlying protocols used by the socket API have evolved over the years, and new ones have developed, the low-level API has remained the same.
The most common type of socket applications are client-server applications, where one side acts as the server and waits for connections from clients. This is the type of application that you’ll be creating in this tutorial. More specifically, you’ll focus on the socket API for Internet sockets, sometimes called Berkeley or BSD sockets. There are also Unix domain sockets, which can only be used to communicate between processes on the same host.
Python’s socket module provides an interface to the Berkeley sockets API. This is the module that you’ll use in this tutorial.
The primary socket API functions and methods in this module are:
Python provides a convenient and consistent API that maps directly to system calls, their C counterparts. In the next section, you’ll learn how these are used together.
As part of its standard library, Python also has classes that make using these low-level socket functions easier. Although it’s not covered in this tutorial, you can check out the socketserver module, a framework for network servers. There are also many modules available that implement higher-level Internet protocols like HTTP and SMTP. For an overview, see Internet Protocols and Support.
You’re going to create a socket object using socket.socket() , specifying the socket type as socket.SOCK_STREAM . When you do that, the default protocol that’s used is the Transmission Control Protocol (TCP). This is a good default and probably what you want.
Why should you use TCP? The Transmission Control Protocol (TCP):
In contrast, User Datagram Protocol (UDP) sockets created with socket.SOCK_DGRAM aren’t reliable, and data read by the receiver can be out-of-order from the sender’s writes.
Why is this important? Networks are a best-effort delivery system. There’s no guarantee that your data will reach its destination or that you’ll receive what’s been sent to you.
Network devices, such as routers and switches, have finite bandwidth available and come with their own inherent system limitations. They have CPUs, memory, buses, and interface packet buffers, just like your clients and servers. TCP relieves you from having to worry about packet loss, out-of-order data arrival, and other pitfalls that invariably happen when you’re communicating across a network.
To better understand this, check out the sequence of socket API calls and data flow for TCP:
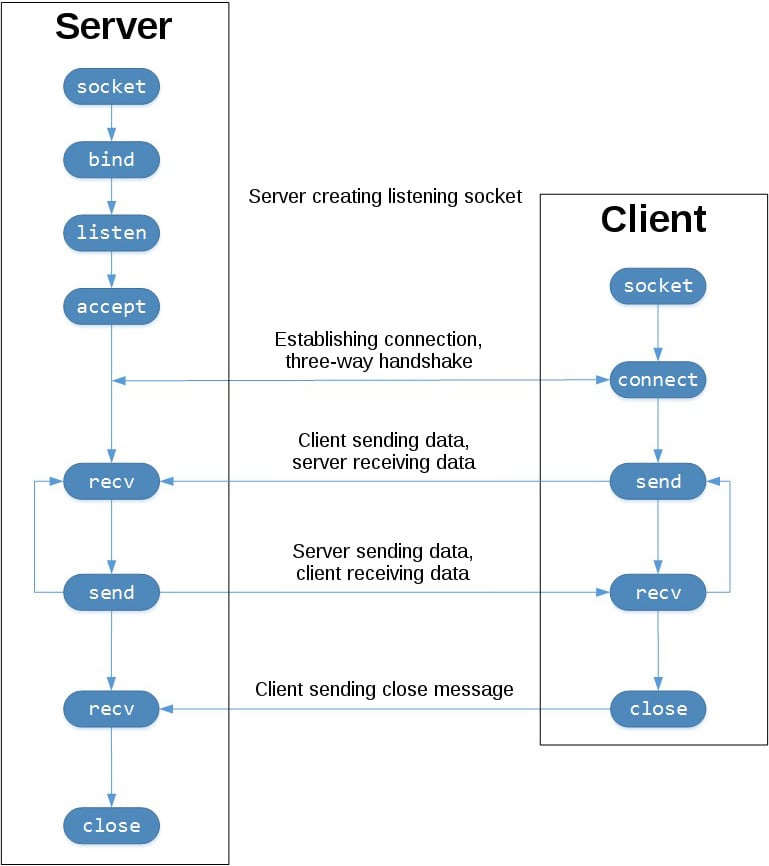
The left-hand column represents the server. On the right-hand side is the client.
Starting in the top left-hand column, note the API calls that the server makes to set up a “listening” socket:
A listening socket does just what its name suggests. It listens for connections from clients. When a client connects, the server calls .accept() to accept, or complete, the connection.
The client calls .connect() to establish a connection to the server and initiate the three-way handshake. The handshake step is important because it ensures that each side of the connection is reachable in the network, in other words that the client can reach the server and vice-versa. It may be that only one host, client, or server can reach the other.
In the middle is the round-trip section, where data is exchanged between the client and server using calls to .send() and .recv() .
At the bottom, the client and server close their respective sockets.
Now that you’ve gotten an overview of the socket API and how the client and server communicate, you’re ready to create your first client and server. You’ll begin with a simple implementation. The server will simply echo whatever it receives back to the client.
Here’s the server:
# echo-server.py import socket HOST = "127.0.0.1" # Standard loopback interface address (localhost) PORT = 65432 # Port to listen on (non-privileged ports are > 1023) with socket.socket(socket.AF_INET, socket.SOCK_STREAM) as s: s.bind((HOST, PORT)) s.listen() conn, addr = s.accept() with conn: print(f"Connected by addr>") while True: data = conn.recv(1024) if not data: break conn.sendall(data) Note: Don’t worry about understanding everything above right now. There’s a lot going on in these few lines of code. This is just a starting point so you can see a basic server in action.
There’s a reference section at the end of this tutorial that has more information and links to additional resources. You’ll also find these and other useful links throughout the tutorial.
Okay, so what exactly is happening in the API call?
socket.socket() creates a socket object that supports the context manager type, so you can use it in a with statement. There’s no need to call s.close() :
with socket.socket(socket.AF_INET, socket.SOCK_STREAM) as s: pass # Use the socket object without calling s.close(). The arguments passed to socket() are constants used to specify the address family and socket type. AF_INET is the Internet address family for IPv4. SOCK_STREAM is the socket type for TCP, the protocol that will be used to transport messages in the network.
The .bind() method is used to associate the socket with a specific network interface and port number:
# echo-server.py # . with socket.socket(socket.AF_INET, socket.SOCK_STREAM) as s: s.bind((HOST, PORT)) # . The values passed to .bind() depend on the address family of the socket. In this example, you’re using socket.AF_INET (IPv4). So it expects a two-tuple: (host, port) .
host can be a hostname, IP address, or empty string. If an IP address is used, host should be an IPv4-formatted address string. The IP address 127.0.0.1 is the standard IPv4 address for the loopback interface, so only processes on the host will be able to connect to the server. If you pass an empty string, the server will accept connections on all available IPv4 interfaces.
port represents the TCP port number to accept connections on from clients. It should be an integer from 1 to 65535 , as 0 is reserved. Some systems may require superuser privileges if the port number is less than 1024 .
Here’s a note on using hostnames with .bind() :
“If you use a hostname in the host portion of IPv4/v6 socket address, the program may show a non-deterministic behavior, as Python uses the first address returned from the DNS resolution. The socket address will be resolved differently into an actual IPv4/v6 address, depending on the results from DNS resolution and/or the host configuration. For deterministic behavior use a numeric address in host portion.” (Source)
You’ll learn more about this later, in Using Hostnames. For now, just understand that when using a hostname, you could see different results depending on what’s returned from the name resolution process. These results could be anything. The first time you run your application, you might get the address 10.1.2.3 . The next time, you get a different address, 192.168.0.1 . The third time, you could get 172.16.7.8 , and so on.
In the server example, .listen() enables a server to accept connections. It makes the server a “listening” socket:
# echo-server.py # . with socket.socket(socket.AF_INET, socket.SOCK_STREAM) as s: s.bind((HOST, PORT)) s.listen() conn, addr = s.accept() # . The .listen() method has a backlog parameter. It specifies the number of unaccepted connections that the system will allow before refusing new connections. Starting in Python 3.5, it’s optional. If not specified, a default backlog value is chosen.
If your server receives a lot of connection requests simultaneously, increasing the backlog value may help by setting the maximum length of the queue for pending connections. The maximum value is system dependent. For example, on Linux, see /proc/sys/net/core/somaxconn .
The .accept() method blocks execution and waits for an incoming connection. When a client connects, it returns a new socket object representing the connection and a tuple holding the address of the client. The tuple will contain (host, port) for IPv4 connections or (host, port, flowinfo, scopeid) for IPv6. See Socket Address Families in the reference section for details on the tuple values.
One thing that’s imperative to understand is that you now have a new socket object from .accept() . This is important because it’s the socket that you’ll use to communicate with the client. It’s distinct from the listening socket that the server is using to accept new connections:
# echo-server.py # . with socket.socket(socket.AF_INET, socket.SOCK_STREAM) as s: s.bind((HOST, PORT)) s.listen() conn, addr = s.accept() with conn: print(f"Connected by addr>") while True: data = conn.recv(1024) if not data: break conn.sendall(data) After .accept() provides the client socket object conn , an infinite while loop is used to loop over blocking calls to conn.recv() . This reads whatever data the client sends and echoes it back using conn.sendall() .
If conn.recv() returns an empty bytes object, b'' , that signals that the client closed the connection and the loop is terminated. The with statement is used with conn to automatically close the socket at the end of the block.
Now let’s look at the client:
# echo-client.py import socket HOST = "127.0.0.1" # The server's hostname or IP address PORT = 65432 # The port used by the server with socket.socket(socket.AF_INET, socket.SOCK_STREAM) as s: s.connect((HOST, PORT)) s.sendall(b"Hello, world") data = s.recv(1024) print(f"Received data!r>") In comparison to the server, the client is pretty simple. It creates a socket object, uses .connect() to connect to the server and calls s.sendall() to send its message. Lastly, it calls s.recv() to read the server’s reply and then prints it.
In this section, you’ll run the client and server to see how they behave and inspect what’s happening.
Note: If you’re having trouble getting the examples or your own code to run from the command line, read How Do I Make My Own Command-Line Commands Using Python? or How to Run Your Python Scripts. If you’re on Windows, check the Python Windows FAQ.
Open a terminal or command prompt, navigate to the directory that contains your scripts, ensure that you have Python 3.6 or above installed and on your path, then run the server:
$ python echo-server.py Your terminal will appear to hang. That’s because the server is blocked, or suspended, on .accept() :
# echo-server.py # . with socket.socket(socket.AF_INET, socket.SOCK_STREAM) as s: s.bind((HOST, PORT)) s.listen() conn, addr = s.accept() with conn: print(f"Connected by addr>") while True: data = conn.recv(1024) if not data: break conn.sendall(data) It’s waiting for a client connection. Now, open another terminal window or command prompt and run the client:
$ python echo-client.py Received b'Hello, world' In the server window, you should notice something like this:
$ python echo-server.py Connected by ('127.0.0.1', 64623) In the output above, the server printed the addr tuple returned from s.accept() . This is the client’s IP address and TCP port number. The port number, 64623 , will most likely be different when you run it on your machine.
To see the current state of sockets on your host, use netstat . It’s available by default on macOS, Linux, and Windows.
Here’s the netstat output from macOS after starting the server:
$ netstat -an Active Internet connections (including servers) Proto Recv-Q Send-Q Local Address Foreign Address (state) tcp4 0 0 127.0.0.1.65432 *.* LISTEN Notice that Local Address is 127.0.0.1.65432 . If echo-server.py had used HOST = "" instead of HOST = "127.0.0.1" , netstat would show this:
$ netstat -an Active Internet connections (including servers) Proto Recv-Q Send-Q Local Address Foreign Address (state) tcp4 0 0 *.65432 *.* LISTEN Local Address is *.65432 , which means all available host interfaces that support the address family will be used to accept incoming connections. In this example, socket.AF_INET was used (IPv4) in the call to socket() . You can see this in the Proto column: tcp4 .
The output above is trimmed to show the echo server only. You’ll likely see much more output, depending on the system you’re running it on. The things to notice are the columns Proto , Local Address , and (state) . In the last example above, netstat shows that the echo server is using an IPv4 TCP socket ( tcp4 ), on port 65432 on all interfaces ( *.65432 ), and it’s in the listening state ( LISTEN ).
Another way to access this, along with additional helpful information, is to use lsof (list open files). It’s available by default on macOS and can be installed on Linux using your package manager, if it’s not already:
$ lsof -i -n COMMAND PID USER FD TYPE DEVICE SIZE/OFF NODE NAME Python 67982 nathan 3u IPv4 0xecf272 0t0 TCP *:65432 (LISTEN) lsof gives you the COMMAND , PID (process ID), and USER (user ID) of open Internet sockets when used with the -i option. Above is the echo server process.
netstat and lsof have a lot of options available and differ depending on the OS that you’re running them on. Check the man page or documentation for both. They’re definitely worth spending a little time with and getting to know. You’ll be rewarded. On macOS and Linux, use man netstat and man lsof . For Windows, use netstat /? .
Here’s a common error that you’ll encounter when a connection attempt is made to a port with no listening socket:
$ python echo-client.py Traceback (most recent call last): File "./echo-client.py", line 9, in s.connect((HOST, PORT)) ConnectionRefusedError: [Errno 61] Connection refused Either the specified port number is wrong or the server isn’t running. Or maybe there’s a firewall in the path that’s blocking the connection, which can be easy to forget about. You may also see the error Connection timed out . Get a firewall rule added that allows the client to connect to the TCP port!
There’s a list of common errors in the reference section.
Now you’ll take a closer look at how the client and server communicated with each other:
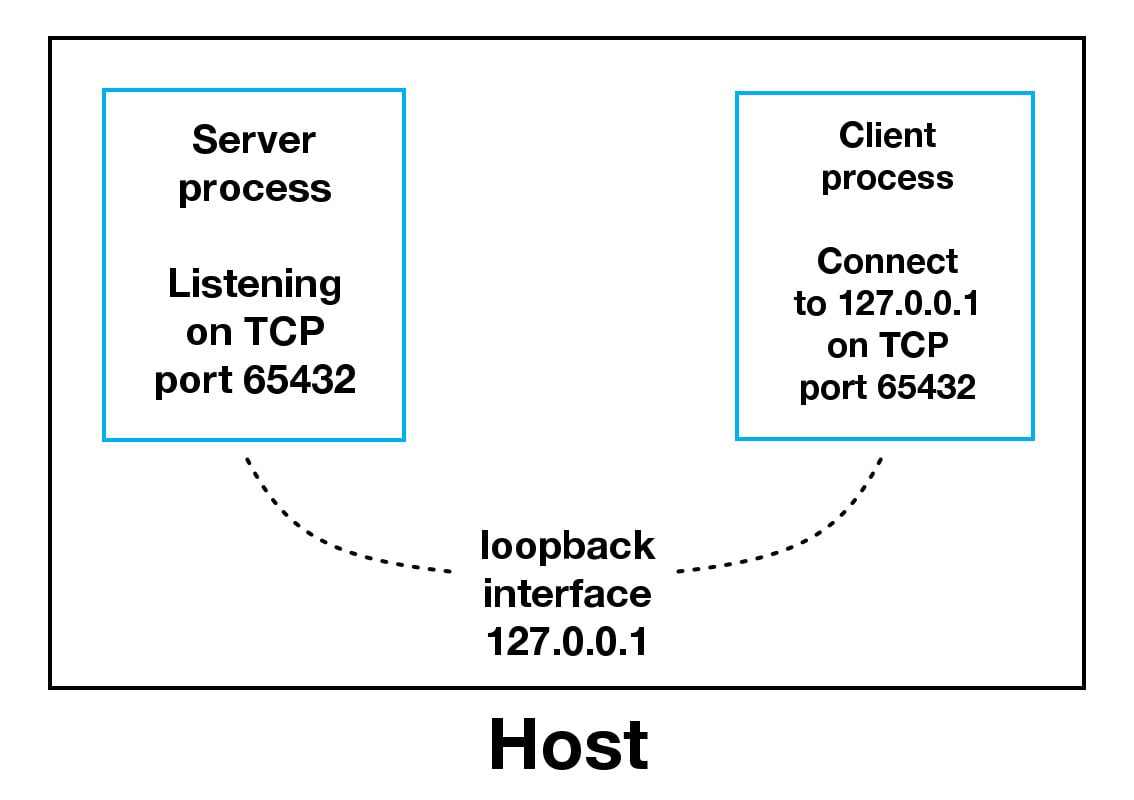
When using the loopback interface (IPv4 address 127.0.0.1 or IPv6 address ::1 ), data never leaves the host or touches the external network. In the diagram above, the loopback interface is contained inside the host. This represents the internal nature of the loopback interface and shows that connections and data that transit it are local to the host. This is why you’ll also hear the loopback interface and IP address 127.0.0.1 or ::1 referred to as “localhost.”
Applications use the loopback interface to communicate with other processes running on the host and for security and isolation from the external network. Because it’s internal and accessible only from within the host, it’s not exposed.
You can see this in action if you have an application server that uses its own private database. If it’s not a database used by other servers, it’s probably configured to listen for connections on the loopback interface only. If this is the case, other hosts on the network can’t connect to it.
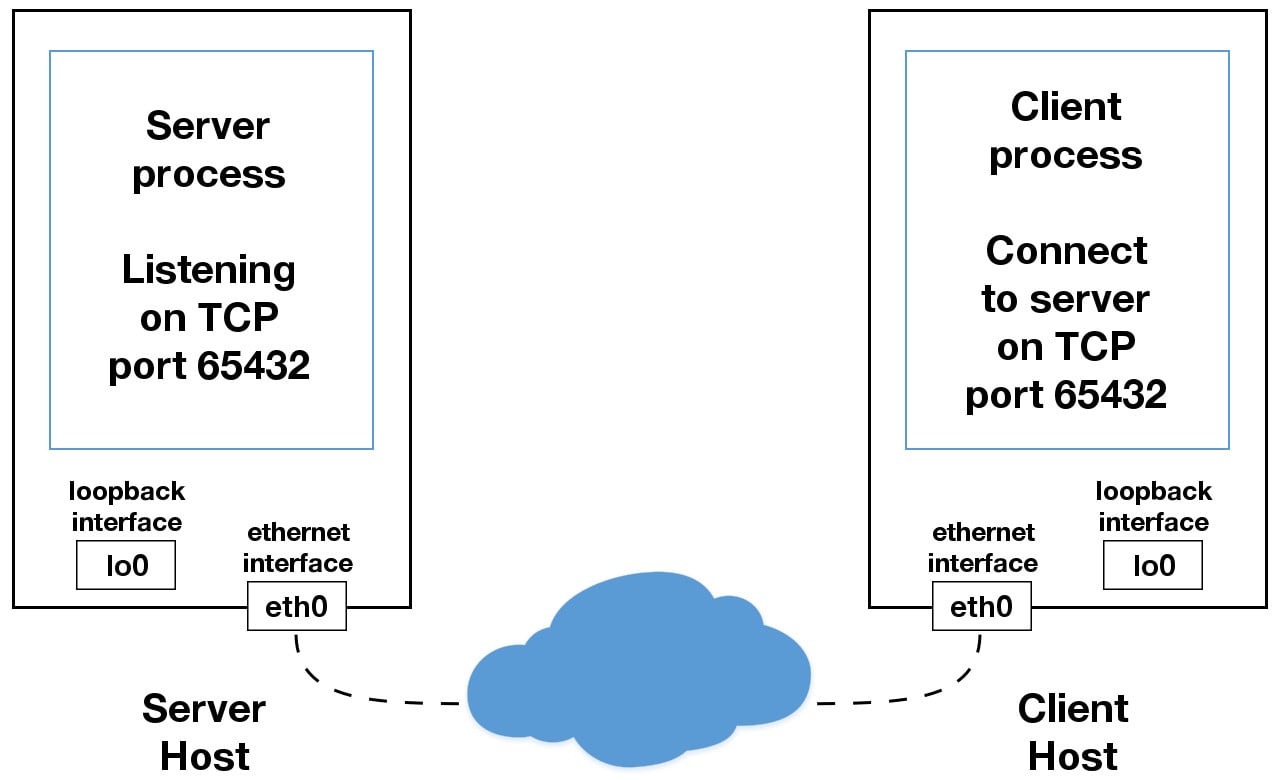
When you use an IP address other than 127.0.0.1 or ::1 in your applications, it’s probably bound to an Ethernet interface that’s connected to an external network. This is your gateway to other hosts outside of your “localhost” kingdom:
Be careful out there. It’s a nasty, cruel world. Be sure to read the section Using Hostnames before venturing from the safe confines of “localhost.” There’s a security note that applies even if you’re not using hostnames but are using IP addresses only.
The echo server definitely has its limitations. The biggest one is that it serves only one client and then exits. The echo client has this limitation too, but there’s an additional problem. When the client uses s.recv() , it’s possible that it will return only one byte, b'H' from b'Hello, world' :
# echo-client.py # . with socket.socket(socket.AF_INET, socket.SOCK_STREAM) as s: s.connect((HOST, PORT)) s.sendall(b"Hello, world") data = s.recv(1024) print(f"Received data!r>") The bufsize argument of 1024 used above is the maximum amount of data to be received at once. It doesn’t mean that .recv() will return 1024 bytes.
The .send() method also behaves this way. It returns the number of bytes sent, which may be less than the size of the data passed in. You’re responsible for checking this and calling .send() as many times as needed to send all of the data:
“Applications are responsible for checking that all data has been sent; if only some of the data was transmitted, the application needs to attempt delivery of the remaining data.” (Source)
In the example above, you avoided having to do this by using .sendall() :
“Unlike send(), this method continues to send data from bytes until either all data has been sent or an error occurs. None is returned on success.” (Source)
You have two problems at this point:
What can you do? There are many approaches to concurrency. A popular approach is to use Asynchronous I/O. asyncio was introduced into the standard library in Python 3.4. The traditional choice is to use threads.
The trouble with concurrency is it’s hard to get right. There are many subtleties to consider and guard against. All it takes is for one of these to manifest itself and your application may suddenly fail in not-so-subtle ways.
This isn’t meant to scare you away from learning and using concurrent programming. If your application needs to scale, it’s a necessity if you want to use more than one processor or one core. However, for this tutorial, you’ll use something that’s even more traditional than threads and easier to reason about. You’re going to use the granddaddy of system calls: .select() .
The .select() method allows you to check for I/O completion on more than one socket. So you can call .select() to see which sockets have I/O ready for reading and/or writing. But this is Python, so there’s more. You’re going to use the selectors module in the standard library so that the most efficient implementation is used, regardless of the operating system you happen to be running on:
“This module allows high-level and efficient I/O multiplexing, built upon the select module primitives. Users are encouraged to use this module instead, unless they want precise control over the OS-level primitives used.” (Source)
Still, by using .select() , you’re not able to run concurrently. That said, depending on your workload, this approach may still be plenty fast. It depends on what your application needs to do when it services a request, and the number of clients it needs to support.
asyncio uses single-threaded cooperative multitasking and an event loop to manage tasks. With .select() , you’ll be writing your own version of an event loop, albeit more simply and synchronously. When using multiple threads, even though you have concurrency, you currently have to use the GIL (Global Interpreter Lock) with CPython and PyPy. This effectively limits the amount of work you can do in parallel anyway.
This is all to say that using .select() may be a perfectly fine choice. Don’t feel like you have to use asyncio , threads, or the latest asynchronous library. Typically, in a network application, your application is I/O bound anyway: it could be waiting on the local network, for endpoints on the other side of the network, for disk writes, and so forth.
If you’re getting requests from clients that initiate CPU bound work, look at the concurrent.futures module. It contains the class ProcessPoolExecutor, which uses a pool of processes to execute calls asynchronously.
If you use multiple processes, the operating system is able to schedule your Python code to run in parallel on multiple processors or cores, without the GIL. For ideas and inspiration, see the PyCon talk John Reese - Thinking Outside the GIL with AsyncIO and Multiprocessing - PyCon 2018.
In the next section, you’ll look at examples of a server and client that address these problems. They use .select() to handle multiple connections simultaneously and call .send() and .recv() as many times as needed.
In the next two sections, you’ll create a server and client that handles multiple connections using a selector object created from the selectors module.
First, turn your attention to the multi-connection server. The first part sets up the listening socket:
# multiconn-server.py import sys import socket import selectors import types sel = selectors.DefaultSelector() # . host, port = sys.argv[1], int(sys.argv[2]) lsock = socket.socket(socket.AF_INET, socket.SOCK_STREAM) lsock.bind((host, port)) lsock.listen() print(f"Listening on (host, port)>") lsock.setblocking(False) sel.register(lsock, selectors.EVENT_READ, data=None) The biggest difference between this server and the echo server is the call to lsock.setblocking(False) to configure the socket in non-blocking mode. Calls made to this socket will no longer block. When it’s used with sel.select() , as you’ll see below, you can wait for events on one or more sockets and then read and write data when it’s ready.
sel.register() registers the socket to be monitored with sel.select() for the events that you’re interested in. For the listening socket, you want read events: selectors.EVENT_READ .
To store whatever arbitrary data you’d like along with the socket, you’ll use data . It’s returned when .select() returns. You’ll use data to keep track of what’s been sent and received on the socket.
Next is the event loop:
# multiconn-server.py # . try: while True: events = sel.select(timeout=None) for key, mask in events: if key.data is None: accept_wrapper(key.fileobj) else: service_connection(key, mask) except KeyboardInterrupt: print("Caught keyboard interrupt, exiting") finally: sel.close() sel.select(timeout=None) blocks until there are sockets ready for I/O. It returns a list of tuples, one for each socket. Each tuple contains a key and a mask . The key is a SelectorKey namedtuple that contains a fileobj attribute. key.fileobj is the socket object, and mask is an event mask of the operations that are ready.
If key.data is None , then you know it’s from the listening socket and you need to accept the connection. You’ll call your own accept_wrapper() function to get the new socket object and register it with the selector. You’ll look at that in a moment.
If key.data is not None , then you know it’s a client socket that’s already been accepted, and you need to service it. service_connection() is then called with key and mask as arguments, and that’s everything you need to operate on the socket.
Here’s what your accept_wrapper() function does:
# multiconn-server.py # . def accept_wrapper(sock): conn, addr = sock.accept() # Should be ready to read print(f"Accepted connection from addr>") conn.setblocking(False) data = types.SimpleNamespace(addr=addr, inb=b"", outb=b"") events = selectors.EVENT_READ | selectors.EVENT_WRITE sel.register(conn, events, data=data) # . Because the listening socket was registered for the event selectors.EVENT_READ , it should be ready to read. You call sock.accept() and then call conn.setblocking(False) to put the socket in non-blocking mode.
Remember, this is the main objective in this version of the server because you don’t want it to block. If it blocks, then the entire server is stalled until it returns. That means other sockets are left waiting even though the server isn’t actively working. This is the dreaded “hang” state that you don’t want your server to be in.
Next, you create an object to hold the data that you want included along with the socket using a SimpleNamespace . Because you want to know when the client connection is ready for reading and writing, both of those events are set with the bitwise OR operator:
# multiconn-server.py # . def accept_wrapper(sock): conn, addr = sock.accept() # Should be ready to read print(f"Accepted connection from addr>") conn.setblocking(False) data = types.SimpleNamespace(addr=addr, inb=b"", outb=b"") events = selectors.EVENT_READ | selectors.EVENT_WRITE sel.register(conn, events, data=data) # . The events mask, socket, and data objects are then passed to sel.register() .
Now take a look at service_connection() to see how a client connection is handled when it’s ready:
# multiconn-server.py # . def service_connection(key, mask): sock = key.fileobj data = key.data if mask & selectors.EVENT_READ: recv_data = sock.recv(1024) # Should be ready to read if recv_data: data.outb += recv_data else: print(f"Closing connection to data.addr>") sel.unregister(sock) sock.close() if mask & selectors.EVENT_WRITE: if data.outb: print(f"Echoing data.outb!r> to data.addr>") sent = sock.send(data.outb) # Should be ready to write data.outb = data.outb[sent:] # . This is the heart of the simple multi-connection server. key is the namedtuple returned from .select() that contains the socket object ( fileobj ) and data object. mask contains the events that are ready.
If the socket is ready for reading, then mask & selectors.EVENT_READ will evaluate to True , so sock.recv() is called. Any data that’s read is appended to data.outb so that it can be sent later.
Note the else: block to check if no data is received:
# multiconn-server.py # . def service_connection(key, mask): sock = key.fileobj data = key.data if mask & selectors.EVENT_READ: recv_data = sock.recv(1024) # Should be ready to read if recv_data: data.outb += recv_data else: print(f"Closing connection to data.addr>") sel.unregister(sock) sock.close() if mask & selectors.EVENT_WRITE: if data.outb: print(f"Echoing data.outb!r> to data.addr>") sent = sock.send(data.outb) # Should be ready to write data.outb = data.outb[sent:] # . If no data is received, this means that the client has closed their socket, so the server should too. But don’t forget to call sel.unregister() before closing, so it’s no longer monitored by .select() .
When the socket is ready for writing, which should always be the case for a healthy socket, any received data stored in data.outb is echoed to the client using sock.send() . The bytes sent are then removed from the send buffer:
# multiconn-server.py # . def service_connection(key, mask): # . if mask & selectors.EVENT_WRITE: if data.outb: print(f"Echoing data.outb!r> to data.addr>") sent = sock.send(data.outb) # Should be ready to write data.outb = data.outb[sent:] # . The .send() method returns the number of bytes sent. This number can then be used with slice notation on the .outb buffer to discard the bytes sent.
Now take a look at the multi-connection client, multiconn-client.py . It’s very similar to the server, but instead of listening for connections, it starts by initiating connections via start_connections() :
# multiconn-client.py import sys import socket import selectors import types sel = selectors.DefaultSelector() messages = [b"Message 1 from client.", b"Message 2 from client."] def start_connections(host, port, num_conns): server_addr = (host, port) for i in range(0, num_conns): connid = i + 1 print(f"Starting connection connid> to server_addr>") sock = socket.socket(socket.AF_INET, socket.SOCK_STREAM) sock.setblocking(False) sock.connect_ex(server_addr) events = selectors.EVENT_READ | selectors.EVENT_WRITE data = types.SimpleNamespace( connid=connid, msg_total=sum(len(m) for m in messages), recv_total=0, messages=messages.copy(), outb=b"", ) sel.register(sock, events, data=data) # . num_conns is read from the command-line and is the number of connections to create to the server. Just like the server, each socket is set to non-blocking mode.
You use .connect_ex() instead of .connect() because .connect() would immediately raise a BlockingIOError exception. The .connect_ex() method initially returns an error indicator, errno.EINPROGRESS , instead of raising an exception that would interfere with the connection in progress. Once the connection is completed, the socket is ready for reading and writing and is returned by .select() .
After the socket is set up, the data you want to store with the socket is created using SimpleNamespace . The messages that the client will send to the server are copied using messages.copy() because each connection will call socket.send() and modify the list. Everything needed to keep track of what the client needs to send, has sent, and has received, including the total number of bytes in the messages, is stored in the object data .
Check out the changes made from the server’s service_connection() for the client’s version:
File Changes (diff) def service_connection(key, mask): sock = key.fileobj data = key.data if mask & selectors.EVENT_READ: recv_data = sock.recv(1024) # Should be ready to read if recv_data: - data.outb += recv_data + print(f"Received from connection ") + data.recv_total += len(recv_data) - else: - print(f"Closing connection ") + if not recv_data or data.recv_total == data.msg_total: + print(f"Closing connection ") sel.unregister(sock) sock.close() if mask & selectors.EVENT_WRITE: + if not data.outb and data.messages: + data.outb = data.messages.pop(0) if data.outb: - print(f"Echoing to ") + print(f"Sending to connection ") sent = sock.send(data.outb) # Should be ready to write data.outb = data.outb[sent:]
It’s fundamentally the same but for one important difference. The client keeps track of the number of bytes it’s received from the server so that it can close its side of the connection. When the server detects this, it closes its side of the connection too.
Note that by doing this, the server depends on the client being well-behaved: the server expects the client to close its side of the connection when it’s done sending messages. If the client doesn’t close, the server will leave the connection open. In a real application, you may want to guard against this in your server by implementing a timeout to prevent client connections from accumulating if they don’t send a request after a certain amount of time.
Now it’s time to run multiconn-server.py and multiconn-client.py . They both use command-line arguments. You can run them without arguments to see the options.
For the server, pass host and port numbers:
$ python multiconn-server.py Usage: multiconn-server.py
For the client, also pass the number of connections to create to the server, num_connections :
$ python multiconn-client.py Usage: multiconn-client.pyBelow is the server output when listening on the loopback interface on port 65432:
$ python multiconn-server.py 127.0.0.1 65432 Listening on ('127.0.0.1', 65432) Accepted connection from ('127.0.0.1', 61354) Accepted connection from ('127.0.0.1', 61355) Echoing b'Message 1 from client.Message 2 from client.' to ('127.0.0.1', 61354) Echoing b'Message 1 from client.Message 2 from client.' to ('127.0.0.1', 61355) Closing connection to ('127.0.0.1', 61354) Closing connection to ('127.0.0.1', 61355) Below is the client output when it creates two connections to the server above:
$ python multiconn-client.py 127.0.0.1 65432 2 Starting connection 1 to ('127.0.0.1', 65432) Starting connection 2 to ('127.0.0.1', 65432) Sending b'Message 1 from client.' to connection 1 Sending b'Message 2 from client.' to connection 1 Sending b'Message 1 from client.' to connection 2 Sending b'Message 2 from client.' to connection 2 Received b'Message 1 from client.Message 2 from client.' from connection 1 Closing connection 1 Received b'Message 1 from client.Message 2 from client.' from connection 2 Closing connection 2 Great! Now you’ve run the multi-connection client and server. In the next section, you’ll take this example even further.
The multi-connection client and server example is definitely an improvement compared with where you started. However, now you can take one more step and address the shortcomings of the previous multiconn example in a final implementation: the application client and server.
You want a client and server that handle errors appropriately so that other connections aren’t affected. Obviously, your client or server shouldn’t come crashing down in a ball of fury if an exception isn’t caught. This is something you haven’t had to worry about until now, because the examples have intentionally left out error handling for brevity and clarity.
Now that you’re familiar with the basic API, non-blocking sockets, and .select() , you can add some error handling and address the elephant in the room, which the examples have kept hidden from you behind that large curtain over there. Remember that custom class that was mentioned way back in the introduction? That’s what you’re going to explore next.
First, you’ll address the errors:
“All errors raise exceptions. The normal exceptions for invalid argument types and out-of-memory conditions can be raised; starting from Python 3.3, errors related to socket or address semantics raise OSError or one of its subclasses.” (Source)
So, one thing you need to do is catch OSError . Another important consideration in relation to errors is timeouts. You’ll see them discussed in many places in the documentation. Timeouts happen and are a so-called normal error. Hosts and routers are rebooted, switch ports go bad, cables go bad, cables get unplugged, you name it. You should be prepared for these and other errors, handling them in your code.
What about the elephant in the room? As hinted by the socket type socket.SOCK_STREAM , when using TCP, you’re reading from a continuous stream of bytes. It’s like reading from a file on disk, but instead you’re reading bytes from the network. However, unlike reading a file, there’s no f.seek() .
In other words, you can’t reposition the socket pointer, if there was one, and move around the data.
When bytes arrive at your socket, there are network buffers involved. Once you’ve read them, they need to be saved somewhere, or else you will have dropped them. Calling .recv() again reads the next stream of bytes available from the socket.
You’ll be reading from the socket in chunks. So, you need to call .recv() and save the data in a buffer until you’ve read enough bytes to have a complete message that makes sense to your application.
It’s up to you to define and keep track of where the message boundaries are. As far as the TCP socket is concerned, it’s just sending and receiving raw bytes to and from the network. It knows nothing about what those raw bytes mean.
This is why you need to define an application-layer protocol. What’s an application-layer protocol? Put simply, your application will send and receive messages. The format of these messages are your application’s protocol.
In other words, the length and format that you choose for these messages define the semantics and behavior of your application. This is directly related to what you learned in the previous paragraph regarding reading bytes from the socket. When you’re reading bytes with .recv() , you need to keep up with how many bytes were read, and figure out where the message boundaries are.
How can you do this? One way is to always send fixed-length messages. If they’re always the same size, then it’s easy. When you’ve read that number of bytes into a buffer, then you know you have one complete message.
However, using fixed-length messages is inefficient for small messages where you’d need to use padding to fill them out. Also, you’re still left with the problem of what to do about data that doesn’t fit into one message.
In this tutorial, you’ll learn a generic approach, one that’s used by many protocols, including HTTP. You’ll prefix messages with a header that includes the content length as well as any other fields you need. By doing this, you’ll only need to keep up with the header. Once you’ve read the header, you can process it to determine the length of the message’s content. With the content length, you can then read that number of bytes to consume it.
You’ll implement this by creating a custom class that can send and receive messages that contain text or binary data. You can improve and extend this class for your own applications. The most important thing is that you’ll be able to see an example of how this is done.
Before you get started, there’s something you need to know regarding sockets and bytes. As you learned earlier, when sending and receiving data via sockets, you’re sending and receiving raw bytes.
If you receive data and want to use it in a context where it’s interpreted as multiple bytes, for example a 4-byte integer, you’ll need to take into account that it could be in a format that’s not native to your machine’s CPU. The client or server on the other end could have a CPU that uses a different byte order than your own. If this is the case, then you’ll need to convert it to your host’s native byte order before using it.
This byte order is referred to as a CPU’s endianness. See Byte Endianness in the reference section for details. You’ll avoid this issue by taking advantage of Unicode for your message header and using the encoding UTF-8. Since UTF-8 uses an 8-bit encoding, there are no byte ordering issues.
You can find an explanation in Python’s Encodings and Unicode documentation. Note that this applies to the text header only. You’ll use an explicit type and encoding defined in the header for the content that’s being sent, the message payload. This will allow you to transfer any data that you’d like (text or binary), in any format.
You can easily determine the byte order of your machine by using sys.byteorder . For example, you could see something like this:
$ python -c 'import sys; print(repr(sys.byteorder))' 'little'